
Materials Needed
- 100 yards of cotton yarn (approximately 50g)
- 4.5mm knitting needles (aka US 7), either straight or circular
Typically, washcloths are made from cotton yarn both for softness and most importantly, absorbency. If you use acrylic yarn it won’t be very effective and water won’t sink in. For this project you can buy one small skein of cotton yarn either online or at a local craft store such as Michael’s.
You will also need size 4.5mm (aka size 7) knitting needles. They can either be straight needles or circular needles. I wouldn’t recommend buying anything fancy or buying an entire set just yet. You need to first find out what you like and what feels best in your hands. I myself use interchangeable circular needles for almost every knitting project, whether big or small. Yet I still would not recommend you go out and buy a bunch of circular needles since they can be a bit intimidating for a brand new knitter.
Besides a pair of scissors, that’s really all you need to get started! There are many other tools and notions, but this will be enough for your first project.
Gauge
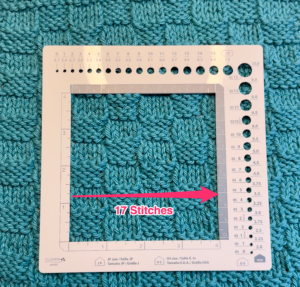
This washcloth will be about 10 inches square. In the pattern it calls for a gauge of 17 stitches over 4 inches. If you end up with a gauge that is more than 17, so for example 20 stitches over 4 inches, you will end up with a smaller washcloth. If your gauge is less than 17, then your washcloth will be larger. For your very first project I would not expect you to knit what we call a “test swatch.”. This is just practice to learn how to knit. You can learn more about how to adjust your gauge later. If your gauge is off for this washcloth, simply knit more or fewer repeats of the pattern until get the overall size that you are satisfied with. You can learn more about tension in your stitches later.
Casting On
Once you have your materials, you are ready to cast on! Casting on refers to placing loops on your needle. The cast on stitches do not count as your first row. You will knit your first row into those loops.
You will cast on 42 stitches onto your needle.
First Row of Knit Stitches
You’re ready to knit into your cast on stitches. With your yarn in the back of your work, hold the needle with the cast on stitches in your left hand, and with your right hand needle, insert the needle into the first stitch from left to right. Loop your yarn counter-clockwise around the tip of the needle, then pull that loop towards you to place the loop onto the right hand needle. That is your first knit stitch. This first row is considered the front or right side (RS) of your work.
Remember that everyone has their own way of knitting. You may not feel comfortable holding the needles or the yarn the way I do. Find your style and what makes you comfortable.
Rows 1-4: Knit all stitches
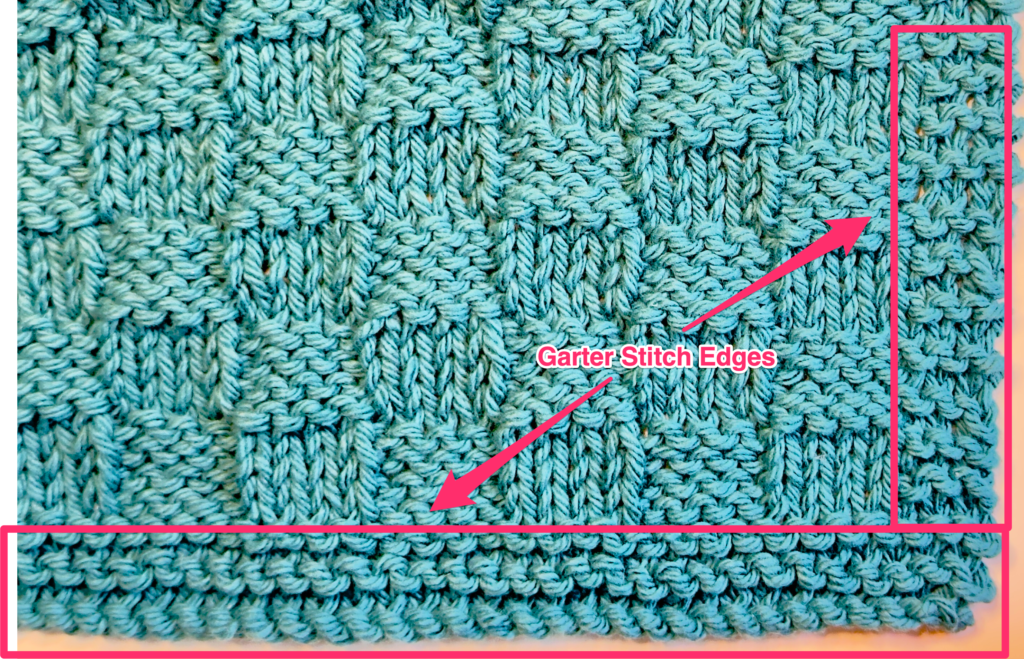
Knit across that first row, when you get to to end, turn your work around. This next row will be considered the back or wrong side (WS) of your work. Your next 3 rows will also be knit stitches, which will give you plenty of practice before we move on to purling. After knitting a total of four rows you might wonder, why doesn’t it look like knitting that I’ve seen on the front of a sweater? That is because when you knit all stitches flat – back and forth – what you see on the front side of your work on the 2nd and 4th rows – are the backside of the knit stitches you did on the wrong side. Knitting on both sides of your work results in a stitch pattern called garter stitch. It creates a texture that looks like ridges.
Next you will learn how to purl!
How to Purl
To purl, place your yarn to the front of your work and insert your right hand needle into the front of the stitch, from right to left, wrap the yarn around the needle counter-clockwise and push the yarn through to create a loop on your needle. This will create a bump that is facing you.
If you turn your work around you will see that the backside of your knit stitches look exactly like the front of your purl stitches. They are simply the opposite of each other. The purl stitch can feel awkward and takes getting used to, but remember to bring your yarn forward each time.
Continuing with the Pattern
Row 5 (RS): K3, *P4, K4* repeat until last 7 sts, P4, K3 (check out the explanation below)
Now that you’ve learned how to both knit and purl, continue on with the pattern. Row 5 says to knit 3, then there is a repeat of four purl (P4) and four knit (K4) stitches. Repeats are often signaled with an * so you will repeat whatever is between the asterisks for either a set number of times, or until you reach a certain point. In this case, repeat *P4, K4* until you have 7 stitches left. Then you will P4 and K3 those last 7 stitches.
Row 6 (WS): K3, *K4, P4* repeat until the last 7 sts, K7
For row 6, which should be the wrong side of your work, you will K3 and then begin your repeat of *K4,P4* until that last 7 stitches which you will knit all seven. Notice that for these repeats we are knitting the knit stitches and purling the purl stitches. We do that so that on the right side of the work we will have the same stitches showing as in the first row since remember, the back of the purl stitch is the knit stitch and vice versa.
Row 7 (RS): repeat row 5
This next row is simple, just repeat what you did in Row 5.
Row 8 (WS): repeat row 6
Row 9 (RS): K7, *P4, K4* repeat until last 7 sts, K7
For row 9, we are switching the pattern around in order to get the look of the checkers. Starting with knitting 7 stitches, then the repeat of *P4,K4* until that last 7 stitches which you will knit.
Row 10 (WS): K3, *P4, K4* repeat until last 3 sts, K3
Row 10 starts with the knit 3 border once again, then the repeat of *P4,K4* until the last 3 stitches which you will knit.
Row 11 (RS): repeat row 9
Row 12 (WS): repeat row 10
Repeats!
Repeat Rows 5-12 5 times, then Rows 5-8 one more time
Now what? Just repeat rows 5-12 five more times, then rows 5-8 one more time. This should give you a length of your washcloth of about 9 1/2 inches.
Final 4 Rows: Knit all stitches
The last four rows will be all knit stitches on both the right side and the wrong side of your work. This will give us that garter stitch border. The sides of the washcloth also have the garter stitch border because we knit the first and last 3 stitches of every row.
Almost Finished. Time to Cast Off (aka Bind off)
You’ve completed the pattern and now it is time to cast off all of your stitches (also referred to as binding off). There are many ways to do so and which cast off method you choose is usually based on how stretchy you want that edge to be. For this piece, it does not need to stretch, unlike if you were casting off the edge of sweater collar that needs to fit over your head.
For the standard, non-stretchy cast off, knit 2 stitches, then lift that first stitch over your second stitch. Then knit another stitch, and lift that stitch on the right over the stitch you just knitted. Continue all the way across that final row until you have only one stitch left on your needle. You can cut your yarn with a few inches of tail left and then pull the stitch through simply by pulling your needle out.
Last Step: Sew in the Ends
For this simple project there are only two ends to sew in. Use a large needle and weave the end into the stitches on the wrong side in such a way that it is the least noticeable. Try to weave it into at least an inch and half of stitches so that it won’t work its way out later.
Pingback: How to Knit Garter Stitch – Knit to the Point
Pingback: Start at the Beginning – For the Newest Knitters – Knit to the Point